Research from the HEAD project, which studied 3,766 pupils across 153 classrooms, found that classroom physical design explained roughly 16% of variation in student learning progress. That's a meaningful number — and it's exactly why the layout of rectangular tables deserves deliberate thought rather than a quick copy of another teacher's room.
This article covers 11 specific layouts designed for rectangular tables, along with the practical specs, ADA requirements, and decision criteria you need to choose the right one for your space.
Key Takeaways
- Rectangular tables seat multiple learners per surface — layout choices compound quickly across attention, collaboration, and traffic flow.
- The 11 layouts range from traditional rows to hollow squares and hybrid rotation setups — each serving a distinct instructional goal.
- Match layout to your primary teaching mode: rows for direct instruction, U-shapes for discussion, pods for group work.
- ADA requirements — 36" aisle width and 27" knee clearance minimum — will constrain your layout options before aesthetics factor in.
Why Rectangular Tables Change the Layout Equation
With individual desks, moving one piece affects one student. With rectangular tables, it affects three to four — or more. That multi-student footprint turns every layout decision into a higher-stakes choice.
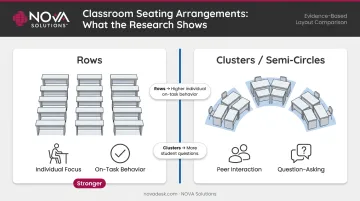
A 1999 study published in Learning Environments Research tracked fourth-graders across 53 lessons and found students asked significantly more questions when seated in a semi-circle compared to rows. That finding has direct implications for how you orient rectangular tables: discussion-focused classes benefit from configurations that create face-to-face visibility, while lecture-heavy sessions favor forward-facing rows.
A 2008 review by Wannarka and Ruhl found no single seating arrangement works best for all tasks. Rows tend to support individual on-task behavior; clusters and semi-circles support interaction. For rectangular tables specifically, that means your configuration choice should follow your instructional goal — not just the shape of the room.
What This Means for Rectangular Tables Specifically
- Each table placement locks in 3–6 seats simultaneously — mistakes are harder to correct mid-session.
- Noise travels differently when students sit in clusters versus rows; layout choice directly affects distraction management.
- Plan instructor circulation paths around table ends — not just the gaps between individual seats.
What to Look for in a Rectangular Table Before You Arrange
Before mapping out any layout, confirm your tables meet the specs that determine whether a configuration is actually viable.
Key Dimensions and Capacity
Universities including UConn and Ohio State use 30 inches per student station as a planning benchmark, with typical table depths of 24–30 inches. Ohio State lists 24" × 72" as a typical student table size. Using the 30" standard, a 72"-wide table seats approximately 4 students across one long side comfortably — depending on table width, not as a fixed rule.
NOVA Solutions' Computer Training Tables cover a wide size range to fit real room dimensions:
- Single configurations: widths from 36⅛" to 60"
- Double configurations: widths up to 96"
- Depth options: 18", 24", 26", 30", or 36"
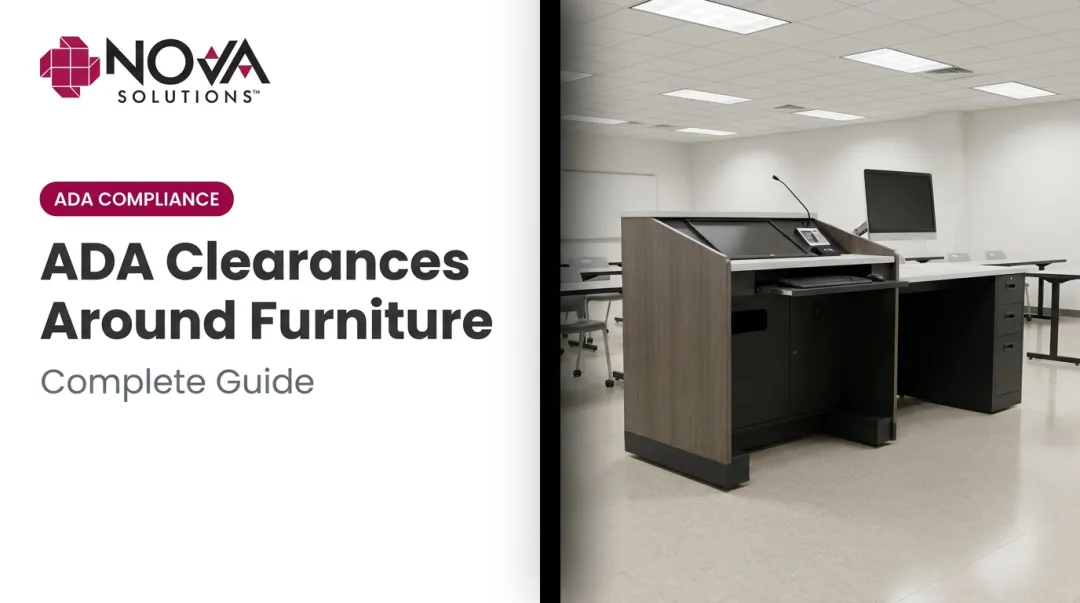
ADA Compliance Requirements
These are non-negotiable. Any layout must accommodate:
- 27" minimum knee clearance height above finished floor
- 30" minimum knee clearance width for wheelchair access
- 36" minimum clear aisle width on accessible routes
- Work surface height between 28" and 34" for adult accessible surfaces
NOVA's tables are available at 32" ADA-compliant height, and their designs are built to meet these clearance standards. Accessible end-seat positioning should be confirmed before finalizing any layout that uses perimeter or U-shape configurations.
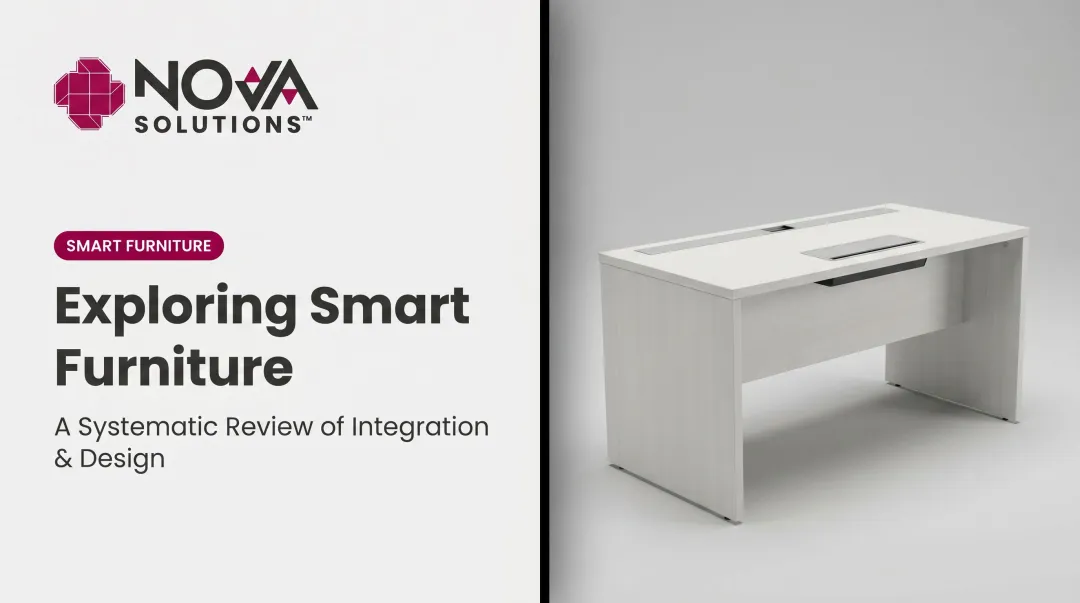
Technology Integration
Tables with integrated wire management eliminate the cord clutter that undermines otherwise well-planned layouts. NOVA's iMod™ system houses a multi-plug power strip and wire management channel per user in a rear compartment with a removable modesty panel, keeping cables off the floor and off the work surface regardless of how tables are arranged. Optional power/data centers and surface grommets extend connectivity further for tech-heavy training rooms.
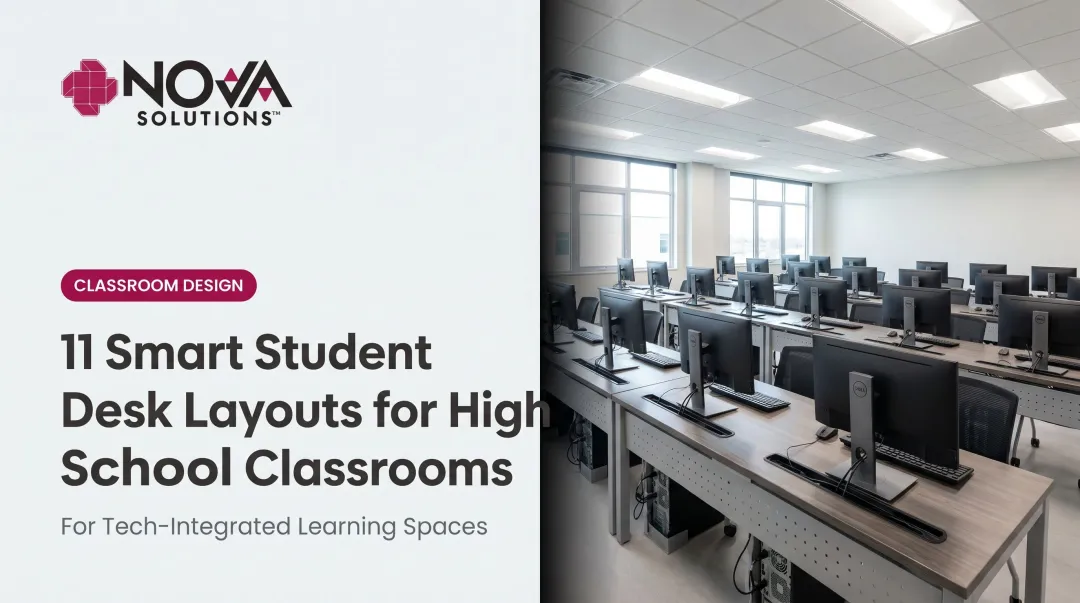
11 Smart Classroom Layouts With Rectangular Tables
Each layout below includes the configuration, ideal use case, and implementation tips specific to rectangular tables.
Layout 1: Traditional Parallel Rows
Configuration: Tables in straight parallel rows, all facing front.
Best for: Direct instruction, standardized testing, lecture-heavy courses where focus matters more than peer interaction.
Tips:
- Maintain at least 36" between rows for ADA-compliant aisle access
- Stagger table positions slightly so rear-row students have cleaner sightlines to the board
- Most space-efficient layout for maximizing student count per square foot
Layout 2: Angled / Chevron Rows
Configuration: Each row angled 30–45 degrees toward the front focal point, creating a V or chevron pattern.
Best for: Lecture-plus-discussion hybrid classes, training rooms where the instructor moves frequently between table sides.
Tips:
- Requires slightly more room width than straight rows
- Gives the instructor easier access to both sides of each table without walking the full length
- Works well in rooms with a center aisle; tables on each side angle inward toward the front
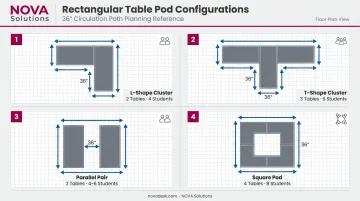
Layout 3: Paired Side-by-Side Tables
Configuration: Two tables placed with long edges touching to create one wider shared workspace.
Best for: Computer training labs, science labs, project-based classrooms requiring larger work surfaces.
Tips:
- Doubles usable surface area per group — particularly valuable for labs with equipment
- Keep outer end seats accessible with clear aisle space on both sides of each paired set
- Ensure the pair doesn't exceed comfortable reach depth across the joined surface
Layout 4: Cluster / Pod Groups
Configuration: Two to three tables arranged in an L-shape or T-shape cluster, creating pods of 4–8 students.
Best for: Cooperative learning, project-based instruction, centers-based elementary through higher education environments.
Tips:
- Some students will have backs partially to the front — use secondary displays or clear signage to compensate
- Leave 36" circulation paths between clusters for instructor access
- Pod layouts require more floor area per student than rows; check your ASF per station before committing
Layout 5: U-Shape (Single)
Configuration: Tables arranged end-to-end along three sides with the open end facing the instructor.
Best for: Seminar-style classes, training sessions with high discussion volume, presentations where all students need sightlines to each other and the front.
Tips:
- Works best for smaller class sizes; larger groups strain sightlines at the far ends of the U
- The instructor can enter the open end and address all students simultaneously
- Leave enough depth inside the U for the instructor to move freely without stepping over chairs
Layout 6: Double-U / Nested Horseshoe
Configuration: A second inner row inside a U-shape, with a narrow aisle between the two rows; open end faces the instructor.
Best for: Larger groups where whole-class discussion is still a priority.
Tips:
- Inner-row students may have obstructed views if the instructor moves to the back of the U — keep instructional focal points near the open end
- ADA-compliant aisle widths between inner and outer rows are required; don't sacrifice this for an extra seat
- Consider secondary screens at the rear to maintain visual access for all students
Layout 7: Conference / Boardroom
Configuration: All tables pushed together lengthwise to form one large central table, with students seated on both long sides and the ends facing inward.
Best for: Small graduate seminars, faculty workshops, executive training, any session centered on peer-to-peer discussion.
Tips:
- Not ideal when everyone needs simultaneous access to a shared screen or front board
- End seats can become isolated; limit the combined length to maintain a cohesive group dynamic
- Best with groups under 16 — larger numbers make cross-table discussion difficult
Layout 8: Hollow Square
Configuration: Tables arranged in a closed square or rectangle perimeter with an empty center.
Best for: Debate-style classes, interactive workshops, sessions requiring equal visual access and structured turn-taking.
Tips:
- Requires a larger room footprint than conference style — account for the empty center space
- The open center allows the instructor to enter, post materials, or use a central display
- Works well with projection or displays mounted on multiple walls so all sides can see
Layout 9: T-Shape / Spine Layout
Configuration: One row of tables as a central spine with shorter rows attached perpendicularly at one end, forming a T.
Best for: Demonstration-heavy classes where the instructor leads from the top of the T; useful in irregularly shaped rooms where a U won't fit.
Tips:
- The head-of-table position gives the instructor strong visual authority and easy access to all sides
- Side arms of the T can accommodate larger groups than a pure U in some room shapes
- Sightlines from the far ends of the T arms to the front may require angled seating
Layout 10: Perimeter / Wall-Facing Layout
Configuration: Tables pushed against two or three walls so students face outward; chairs can be turned inward for group discussion.
Best for: Art classrooms, STEM labs, maker spaces, rooms that double as meeting and movement spaces.
Tips:
- Opens the center of the room for demonstrations, movement, or floor-based activities
- Students can pivot chairs inward quickly for group discussion without rearranging furniture
- Particularly effective for small rooms that need maximum open floor space during part of the class

Layout 11: Flexible / Hybrid Rotation Layout
Configuration: Designated zones within one room — rows for direct instruction, pod clusters for group work, a U for discussion — with students rotating between zones or tables reconfigured between sessions.
Best for: Active-learning classrooms, flipped classroom models, multi-purpose training facilities.
Tips:
- Requires tables with nesting or folding capability; look for horizontal nesting and smooth-rolling casters so staff can reconfigure the room in minutes rather than rescheduling it (NOVA Solutions' Nesting Multi-Purpose Tables are designed with both features for exactly this use case)
- Mark floor zones clearly so reconfiguration takes minutes, not a planning session
- Cannon Air Force Base applied this layout using nesting tables, shifting between training configurations without dedicated setup time between sessions
How to Choose the Right Layout for Your Space
Use this three-question framework before committing to any arrangement:
1. What is the primary instructional mode?
| Teaching Mode | Best Layouts |
|---|---|
| Direct instruction / lecture | Rows, Chevron |
| Discussion / seminar | U-Shape, Double-U, Conference, Hollow Square |
| Group collaboration | Pods, Flexible Hybrid |
| Mixed / multi-mode | Flexible Hybrid, Chevron |
2. How many students, and does the room meet ADA requirements for this layout?
Calculate total seating using the 30" per student station standard, then verify that your chosen layout maintains 36" ADA-compliant aisles throughout. A layout that maximizes seating but fails ADA clearance requirements creates real legal exposure — not just a planning problem.
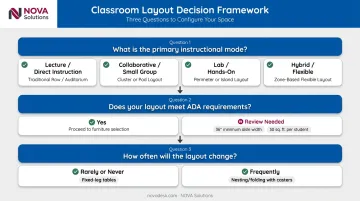
3. How often will the layout need to change?
If the answer is frequently, your tables need to support it physically. Fixed-leg tables work fine for permanent rows; reconfigurable environments require folding or nesting tables with casters.
The most common mistake educators make is selecting a layout based on aesthetics — or copying a colleague's setup — without accounting for their room's actual dimensions. Sketch a scaled floor plan with real table measurements before moving a single piece of furniture.
Cornell's classroom space guidelines recommend 26–32 ASF per station for active learning with tables, and 28–32 ASF for group work with inward-facing tables. Check those figures against your available square footage before settling on any layout.
Conclusion
Rectangular tables open up layout possibilities that individual desks can't match, but they also demand more deliberate planning. A misplaced cluster of tables affects six students at once; a well-planned layout makes that same cluster a high-functioning collaborative unit.
The 11 layouts above cover the full range from maximum-focus rows to fully flexible hybrid zones. The right one depends on your room dimensions, class size, teaching approach, and ADA requirements. What looks good in a floor plan photo isn't always what works in practice.
NOVA Solutions builds computer training tables and nesting multi-purpose tables specifically for educational and training environments. Their tables are ADA-compliant, integrate with the iMod™ wire management system, and are manufactured in the USA.
For government and institutional buyers, NOVA holds a GSA contract (GS-28F-005GA) that simplifies procurement. Every configuration in this guide is supported without the cable management issues or accessibility gaps that generic tables typically introduce.
Frequently Asked Questions
What is the most effective classroom layout?
No single layout works universally. The arrangement should match the instructional method — rows work best for direct instruction and individual work, while U-shapes and pod clusters outperform for discussion and collaboration.
What is the best classroom layout for group work?
Pod clusters or L-shaped table groupings work best for group collaboration. They allow face-to-face interaction among 4–6 students and give the instructor clear access to each group without disrupting others.
What is the best seating arrangement for students with ADHD?
Front-row or near-front placement within a rows or U-shape layout minimizes distractions by reducing peer stimulation from multiple directions and keeping the student close to the instructor. Students with an IEP or 504 plan may be entitled to preferential seating as a formal accommodation.
Does where a student sits really matter?
Yes. A 2020 observational study of 558 undergraduates found front-seated students averaged 82.5% performance compared to 78.1% for back-seated students (p < 0.001). Instructors who assign seats intentionally can reduce those position-based gaps.
How many people sit at a rectangle table?
Using the standard 30" per-student benchmark, a 72"-wide table seats about 4 students per long side. End seats can add 1–2 more, though ADA-compliant configurations sometimes reduce that count to maintain required clearance.
What are the different types of classroom grouping?
The four main types are whole-class, small groups (3–6 students), pairs, and individualized work. Rectangular table layouts can support all four — it comes down to how the tables are arranged.