Introduction
Picture this: a student who uses a wheelchair arrives to first period. The aisle between desks is blocked by a backpack. The lab table is fixed at standing height. The supply shelf sits at 54 inches. Before a single lesson begins, this student has already been excluded three times.
Physical barriers like these rarely announce themselves. They stack up invisibly — and each one sends a message about who the classroom was actually designed for.
Creating a wheelchair-accessible classroom is both a legal obligation and a practical commitment to equitable learning. Under the ADA and IDEA, public schools must ensure students with disabilities have equal access to programs and physical spaces. According to NCES data, 7.5 million students received IDEA services in 2022–23 — 15% of all public school students.
Most improvements require intentional planning, not a massive renovation budget.
Key Takeaways
- Maintain 36-inch minimum clear pathways throughout the entire room — every zone, not just near the entrance
- Use height-adjustable, ADA-compliant furniture so wheelchair users share workstations with peers
- Keep all shared materials within the 15- to 48-inch ADA reach range for wheelchair users
- Plan transitions proactively so wheelchair users aren't left waiting during activity changes
- Review IEP/504 plans and ask students directly what works — don't wait for problems to surface
What Wheelchair Accessibility in a Classroom Really Means
Wheelchair accessibility isn't achieved by placing one modified desk near the door. True accessibility means every student can independently reach every part of the room: their assigned seat, group work areas, supply stations, technology, and the teacher's area.
The "convenient placement" approach — parking a wheelchair user at the perimeter — cuts that student off from peer interaction for the entire school day. The result is an inclusion failure, not just a layout oversight.
The Legal Framework
Three federal laws govern classroom physical access:
- ADA Title II — applies to all state and local governments, including public K–12 schools and public higher education. Under DOJ Title II regulations, programs must be readily accessible and usable when viewed in their entirety. For existing facilities, this doesn't always require retrofitting every room — but it does require that the program itself is accessible.
- Section 504 of the Rehabilitation Act — covers any school receiving federal funding. A student's 504 plan may include specific physical accommodation requirements that teachers are obligated to implement.
- IDEA — requires IEPs to document supplementary aids and services needed for a student to participate alongside nondisabled peers. Under IDEA Section 300.323(d), every responsible teacher must be informed of their specific implementation duties.
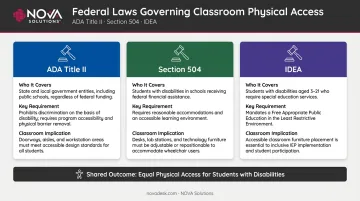
If a student's IEP or 504 plan specifies physical accommodations, those aren't suggestions — compliance is the teacher's direct responsibility, not a discretionary choice.
5 Practical Strategies to Make Your Classroom Accessible for Wheelchair Users
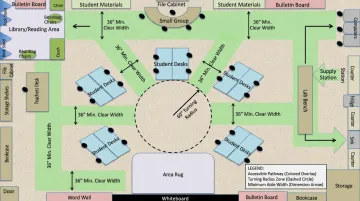
Strategy 1: Design Clear, Open Pathways Throughout the Room
The ADA Standards Section 403.5.1 requires a 36-inch minimum clear width for accessible walking surfaces. Section 304.3.1 requires a 60-inch minimum diameter circular turning space so a wheelchair user can turn around without backing out. A T-shaped alternative (permitted under Section 304.3.2) fits within a 60-inch square with arms and base at least 36 inches wide.
What this means in practice:
- Arrange desks in rows or clusters that preserve open corridors of at least 36 inches
- Eliminate floor-level clutter from day one — bags, cords, and equipment are trip hazards and pathway blockers
- Establish a class norm: personal items go in cubbies or on chair backs, not the floor
- Reserve turning space somewhere in the room, not just a linear route to one seat
The most common oversight: teachers clear a path from the door to the wheelchair user's assigned seat and stop there. Pathways must lead to every active zone — group tables, computer stations, lab benches, and supply areas. If a student can't get to the lab independently, the accessible route isn't complete.
NOVA Solutions' iMod™ wire management system addresses one specific version of this problem: all cables are routed inside the furniture structure, keeping the floor clear of cords that would otherwise cut across pathways.
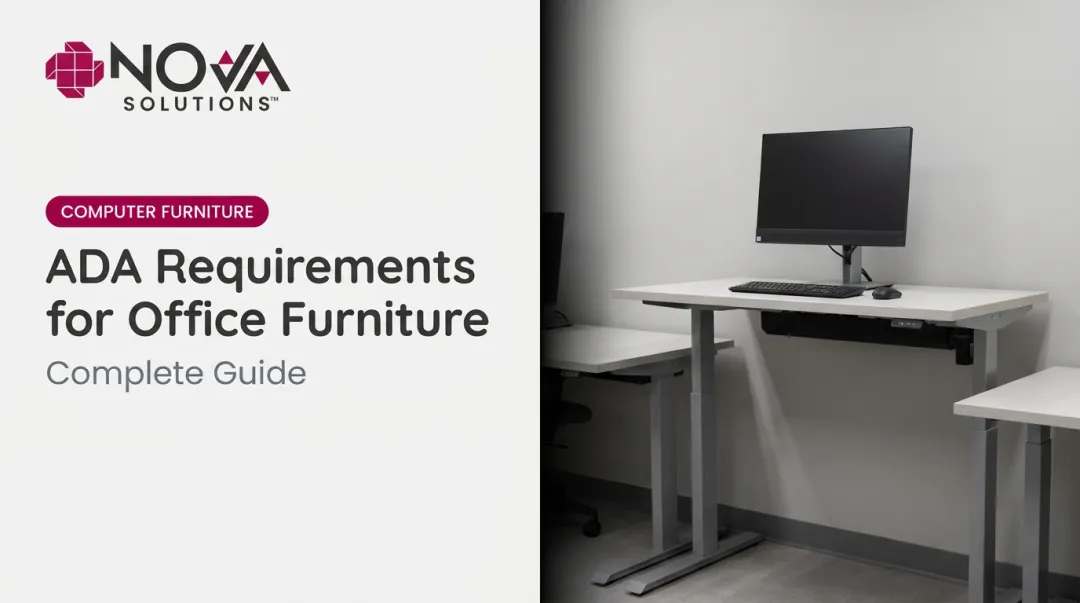
Strategy 2: Use Height-Adjustable, ADA-Compliant Furniture
Standard fixed-height desks frequently exclude wheelchair users. ADA Standards Section 902.3 sets compliant work surface tops at 28 to 34 inches above the floor for general use. Section 306.3.1 defines knee clearance as the space between 9 and 27 inches above the floor, with Section 306.3.4 requiring 30 inches minimum width for knee clearance.
Non-compliant fixed-height furniture creates two problems: the student can't use the surface at all, or they receive a visibly "different" desk that sets them apart from peers.
Height-adjustable tables solve both problems at once. One piece of furniture can serve wheelchair users at lower settings and standing or taller users at higher settings — no separate desk, no perimeter placement.
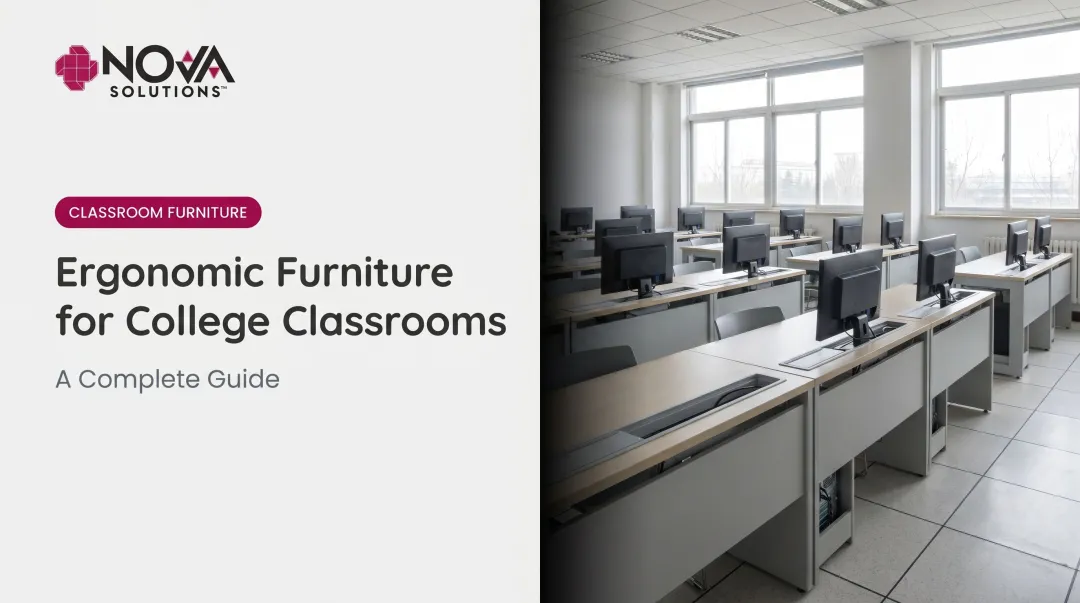
NOVA Solutions' height-adjustable sit/stand training desks adjust electrically from 30 to 42 inches (12 inches of travel) with a lift capacity of 550 lbs. Their ADA-compliant computer training tables are also available at a 32-inch ADA height option in single and double configurations, with depth options from 24 to 30 inches. Universities including Florida Atlantic, Rutgers, and Auburn — plus numerous community colleges — have deployed these configurations in accessible computer labs and classrooms.
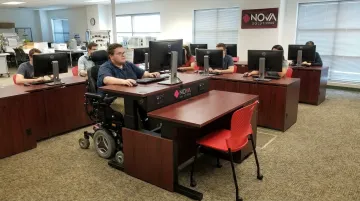
Wheelchair users should sit within peer seating clusters, not at a separate table along the wall. The furniture accommodates the student; the arrangement includes them.
Strategy 3: Place All Materials and Learning Stations Within Accessible Reach
Per ADA Standards Section 308.2.1 and 308.3.1, the standard reach range for a wheelchair user is 15 to 48 inches from the floor — for both forward and unobstructed side reach. Anything stored above or below this range creates a dependency on assistance for routine tasks.
High-friction access points to check:
- Shared supplies (paper, books, lab materials) — use low, open shelving with easy-grip handles
- Computer monitors and keyboards — positioned within the 15–48 inch window
- Interactive whiteboards and displays — viewable and operable from a seated position
- Everyday items: restroom passes, hand sanitizer dispensers, printer stations, charging ports
These small oversights compound. A student who needs to ask for help to access the supply shelf, get a restroom pass, and plug in a device has lost three moments of independence before lunch.
ADA Standards Section 309.4 also requires operable parts — light switches, intercoms, environmental controls — to require no tight grasping, pinching, or twisting, with a maximum 5-pound activation force. Built-in classroom controls — not just furniture — fall within the scope of ADA compliance.
Strategy 4: Plan for Lesson Transitions and Activity Movement
Transitions are the highest-friction moments for wheelchair users. When a teacher says "move to your lab groups," the entire class starts moving at once — and a wheelchair user has less margin for error than someone on foot.
Teachers who don't plan ahead create a recurring, visible problem: the wheelchair user arrives last, needs furniture moved, or can't reach the zone at all.
Three practical fixes:
- Give early transition cues — before announcing a move to the class, give the wheelchair user a quiet heads-up so they can start positioning without an audience
- Design multi-angle access to group zones — activity stations with only one narrow entry point effectively block wheelchair access; build in at least two approach angles
- Assign a "pathway check" role — when rearranging furniture mid-lesson, designate a student to confirm corridors stay at 36 inches as chairs and tables shift
Accessibility extends beyond enrolled students. Parents with disabilities, substitute teachers, and visiting staff all need the same routes. Building accessibility as a permanent classroom feature — not a situational accommodation switched on for one student — means it works reliably for everyone who walks through the door.
Strategy 5: Collaborate With Students, Families, and the 504/IEP Team
The student using a wheelchair knows more about what works in that room than anyone else. Ask directly and ask early — a brief question on a student profile sheet at the start of the year can surface needs before they become problems.
"Is there anything about our classroom setup that makes it harder for you to participate?" is a better starting point than waiting for friction to appear.
Formal collaboration steps:
- Review the student's IEP or 504 plan before school starts — physical accommodation requirements are documented there
- Coordinate with the school's special education coordinator or 504 administrator to confirm all physical requirements are met
- Schedule a brief check-in with families after the first few weeks to confirm accommodations are working in practice, not just on paper
Proactive outreach reflects the actual intent of IDEA and Section 504. Students who experience teachers asking — rather than assuming — tend to self-advocate more readily when needs change later in the year.
How to Audit Your Classroom for Wheelchair Accessibility
Before students arrive, conduct a "wheelchair walk-through." Physically trace the path a wheelchair user would take from the door to every area in the room. Don't stop at the first seat — continue to the supply area, the lab bench, the printer, the teacher's desk.
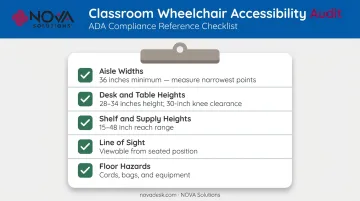
Highest-priority items to check:
- Aisle widths throughout the full room (not just the entry) — measure at the narrowest points
- Desk and table heights — are they within 28–34 inches, with 30 inches of knee clearance width?
- Shelf and supply heights — within the 15–48 inch reach range?
- Line of sight to instructional displays from a seated position
- Floor-level hazards: cords, bags, equipment that narrows pathways
For a structured audit tool, the ADA National Network's existing-facilities checklist — produced by the New England ADA Center based on 2010 ADA Standards — provides a section-by-section framework applicable to classroom elements including routes, work surfaces, storage, and operable parts.
That checklist will also surface issues beyond a teacher's control. Fixed lab tables, inaccessible built-in cabinetry, and structural thresholds require escalation to school administration or facilities management. Document what you find and advocate with specifics — teachers can't always fix structural problems alone, but naming them clearly and putting them in writing is a powerful first step.
Conclusion
Wheelchair accessibility in the classroom comes from layered, consistent action: clear pathways, compliant furniture, accessible materials, planned transitions, and ongoing collaboration with the people who know the student best. None of these strategies require a large budget to begin — most are design choices made before students arrive.
When compliant furniture is the next step, NOVA Solutions manufactures ADA-compliant, height-adjustable computer training desks and tables in the USA — purpose-built for educational environments that balance compliance with function. Their products are available through GSA contract GS-28F-005GA, which streamlines procurement for public schools and reduces the purchasing paperwork involved.
Start with the simplest step this week: walk through your classroom as if you're in a wheelchair. Note every point where a pathway narrows, a surface is too high, or a turn is blocked. That list becomes your action plan.
Frequently Asked Questions
How to make a classroom wheelchair accessible?
Ensure at least 36-inch-wide accessible pathways to every area of the room, use height-adjustable or ADA-compliant furniture with proper knee clearance, place shared materials within the 15–48 inch reach range, and plan transitions so wheelchair users can move between activity zones without delay.
How do you accommodate students with physical disabilities in the classroom?
Accommodation involves both physical adjustments (furniture height, layout, materials placement) and procedural ones, such as giving early transition cues and reviewing the student's IEP or 504 plan. Those plans document formal accommodation requirements, and teachers are legally responsible for implementing them.
How can you make schools more accessible for disabled students?
School-wide accessibility requires physical environment improvements (ADA-compliant routes and furniture), policy changes (accessible materials and assessments), and a cultural shift toward treating disability accommodations as standard rather than exceptional. Classroom teachers drive that shift at the most immediate level — the point where policy meets daily student experience.
Do all schools have to be wheelchair accessible?
Under ADA Title II and Section 504 of the Rehabilitation Act, all US public schools must ensure their programs are accessible to students with disabilities. For existing facilities, compliance is measured by whether the program as a whole is accessible — not necessarily whether every single room is retrofitted. Consult ADA.gov's Title II guidance for current requirements.
What is an accessible classroom?
An accessible classroom is one where every student — regardless of physical disability — can independently navigate the space, reach all learning materials, and fully participate in all activities. It goes beyond individual accommodations to create conditions that work for everyone from the start.