Key Takeaways
- Measure your room first — verify at least 48–60 inches of clearance on all sides before committing to a table size.
- Table shape directly affects meeting dynamics: rectangular favors hierarchy, round promotes equal contribution, U-shape suits presentations with interaction.
- ADA requires a 36-inch minimum pathway, 60-inch turning diameter, and table heights between 28–34 inches — non-negotiable for accessible spaces.
- Plan technology setup — cable routing, power access, display alignment — alongside furniture placement from the start, not as an afterthought.
- Run a pre-meeting walkthrough to test sightlines, AV connections, and accessible pathways before anyone walks through the door.
What to Prepare Before Setting Up Your Conference Room Table
Preparation determines nearly everything. A poor baseline leads to cramped layouts, compliance gaps, and tech setups that don't work — regardless of how good the furniture is.
Room Measurements and Capacity Assessment
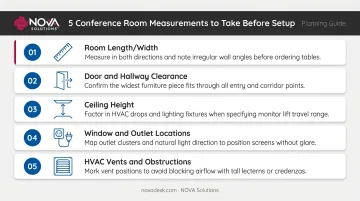
Before moving a single piece of furniture, collect these measurements:
- Room length and width — your primary constraint for table size and configuration
- **Door and hallway clearances** — confirm furniture can physically enter the space before ordering
- Ceiling height — relevant if you're mounting displays, projectors, or pendant lighting
- Window and wall outlet locations — affects table orientation and power access
- HVAC vents and obstructions — avoid positioning seats directly under vents or blocking airflow